 ShareStream: Getting Started Tutorials
Welcome, ShareStream pilot instructors. These tutorials will help you get started with the ShareStream Video Sharing Service. If you run into trouble, give me (Luke Weld) a call at 786-4487 (9am-5pm) or send me an email at lbweld@uaa.alaska.edu and I'll do my best to walk you through the process as I understand it. I may also be able to troubleshoot any difficulties you might be having. This might be easier in person, so if you're on the Anchorage Campus, please stop by and see me anytime in LIB 215. If you have trouble on a weekend, please contact ShareStream support (support@sharestream.com) for assistance; otherwise I'll get back to you Monday morning.
- Activate ShareStream in your Blackboard courses
- Upload a video to ShareStream
- Link to a ShareStream video somewhere in your Course
- Use the ShareStream Dropbox
Activate ShareStream for your Blackboard courses
To begin using ShareStream, you must first activate three ShareStream tools within the courses(s) for which you requested the ShareStream service. If you skip this step, the ShareStream tools may not function correctly.
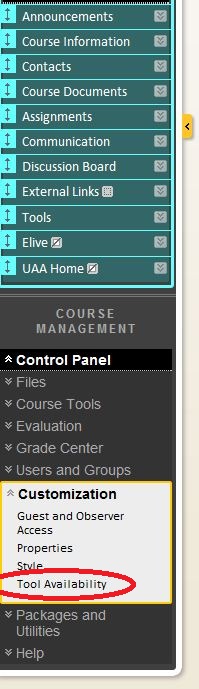
In each course in which you've signed up to use ShareStream, go to the Control Panel. Expand "Customization". The Customization menu will open. Click "Tool Availability".
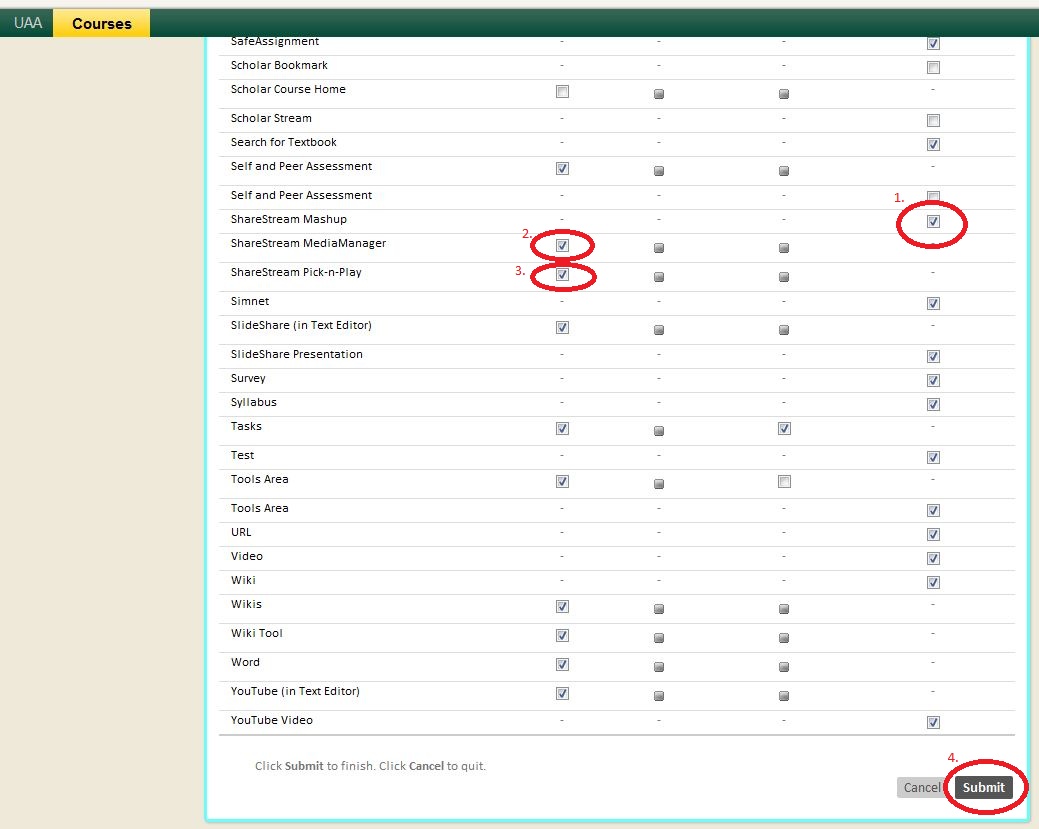
Now activate the ShareStream components: Scroll to the bottom of the Tool Availability Screen and find the following entries: "ShareStream Mashup", "ShareStream MediaManager", and "ShareStream Pick-n-Play." For ShareStream Mashup (1), make sure the rightmost box is checked. For ShareStream Media Manager (2) and ShareStream Pick-n-Play (3), make sure the leftmost boxes are checked. Finally, go to the bottom of the screen and click "Submit" (4).
You must follow this activation procedure for every course (or course section) you've signed up to use with ShareStream; otherwise the ShareStream service may not function properly.
Also, the activation procedure will fail if you attempt to activate ShareStream in a course that isn't on the list (i.e., a course whose name and course ID wasn't provided when you signed up for the ShareStream service). To add a new course to the list, please contact Luke Weld at 786-4487 or at lbweld@uaa.alaska.edu.
Upload a video to ShareStream
NOTE: Since the ShareStream pilot is still in "beta," it's essential that any videos used in class be replicated on the existing Windows Streaming Server (wmv.uaa.alaska.edu) -- in case of pilot failure or cancellation at the end of November. Contact FTC Media Technician Eric Baldwin at 786-4850 or lebaldwin@uaa.alaska.edu to set up a repository of duplicate files before proceeding with your ShareStream uploads.
There's more than one way to upload a video to ShareStream. However, the simplest way seems to be the following (a later tutorial will cover the other way).
First of all, make sure you're using Google Chrome. We've been seeing some upload problems when people try to use Internet Explorer.
In your Blackboard course shell, go to "Tools" in the Main Menu.
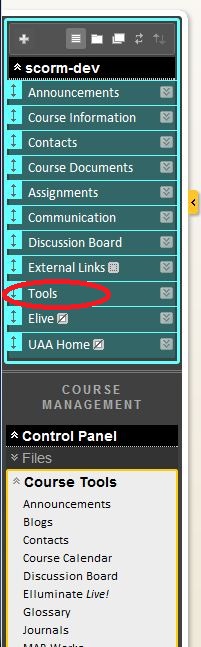
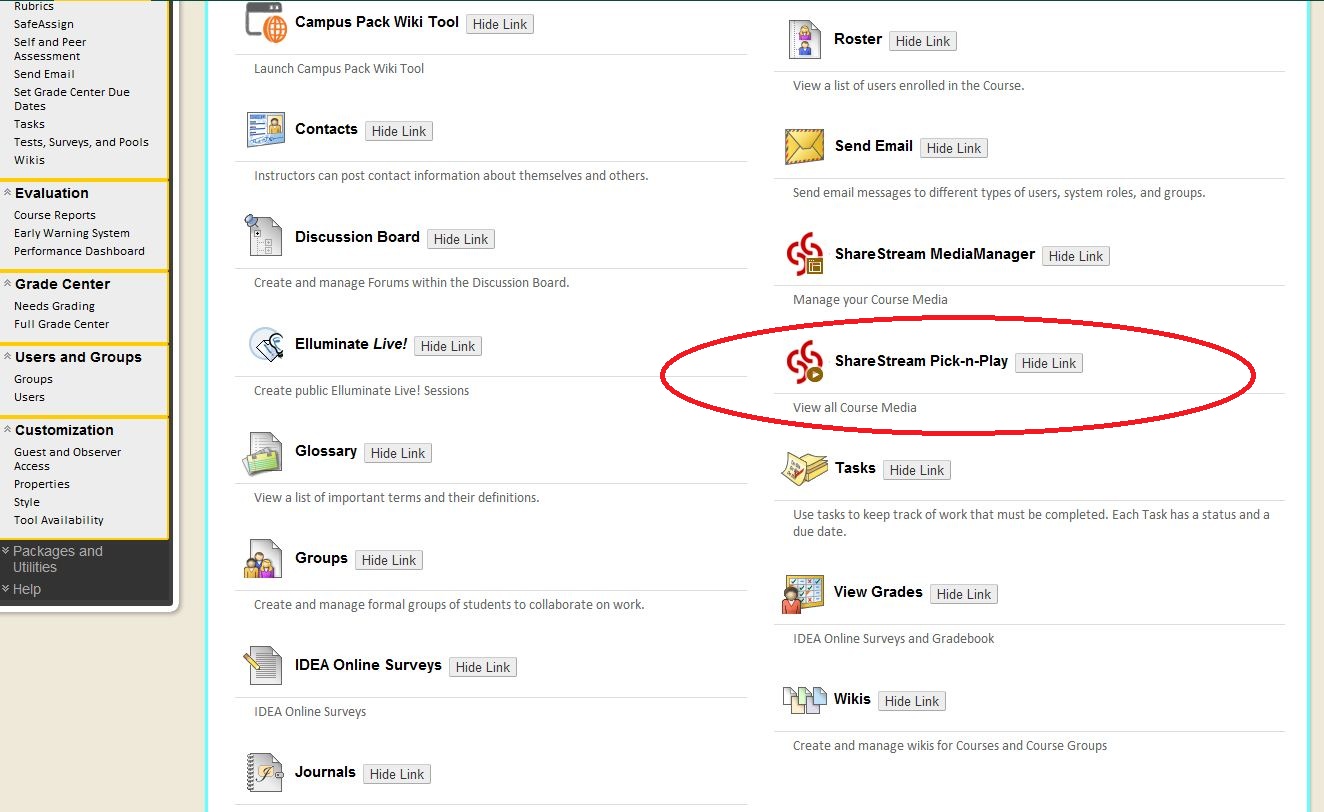
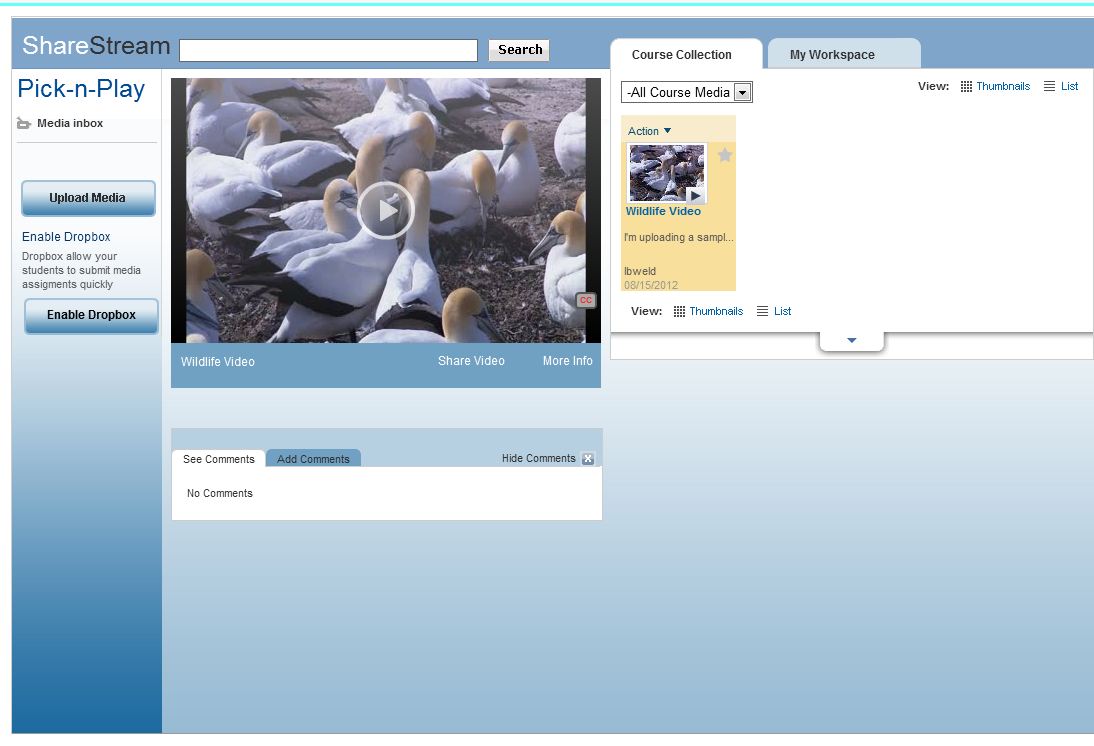
Scroll down to "ShareStream Pick-n-Play" and select it.
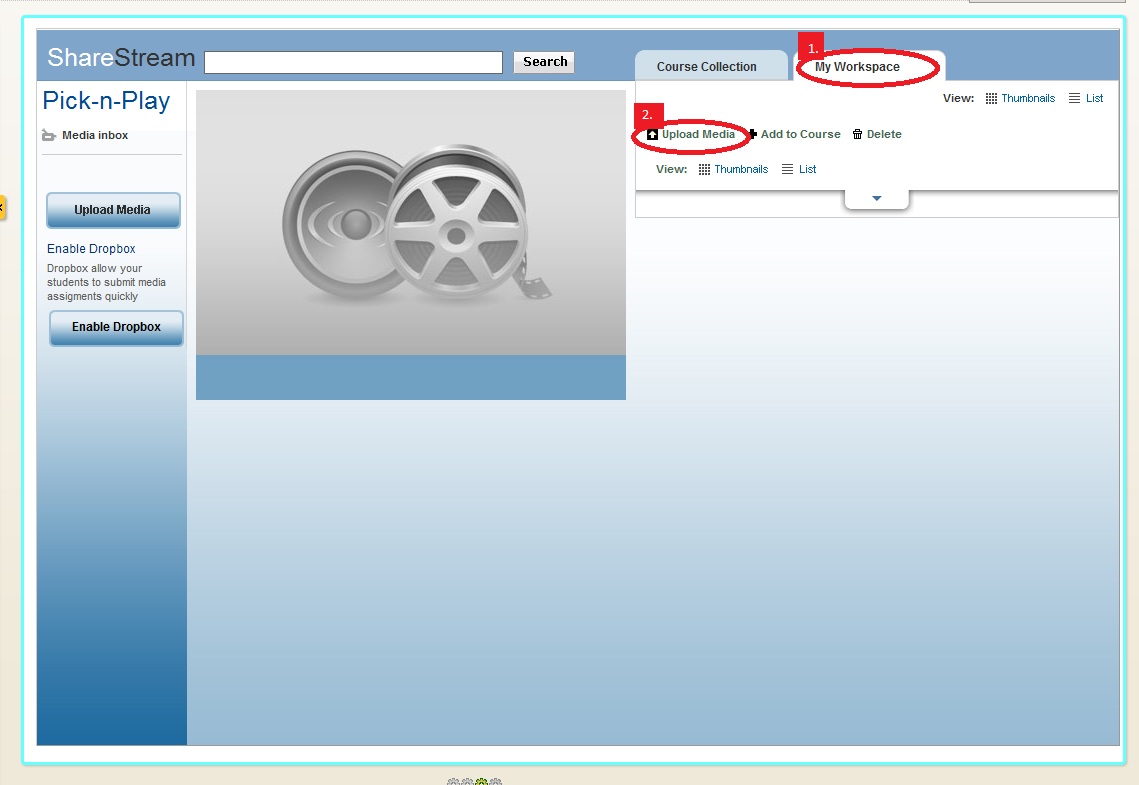
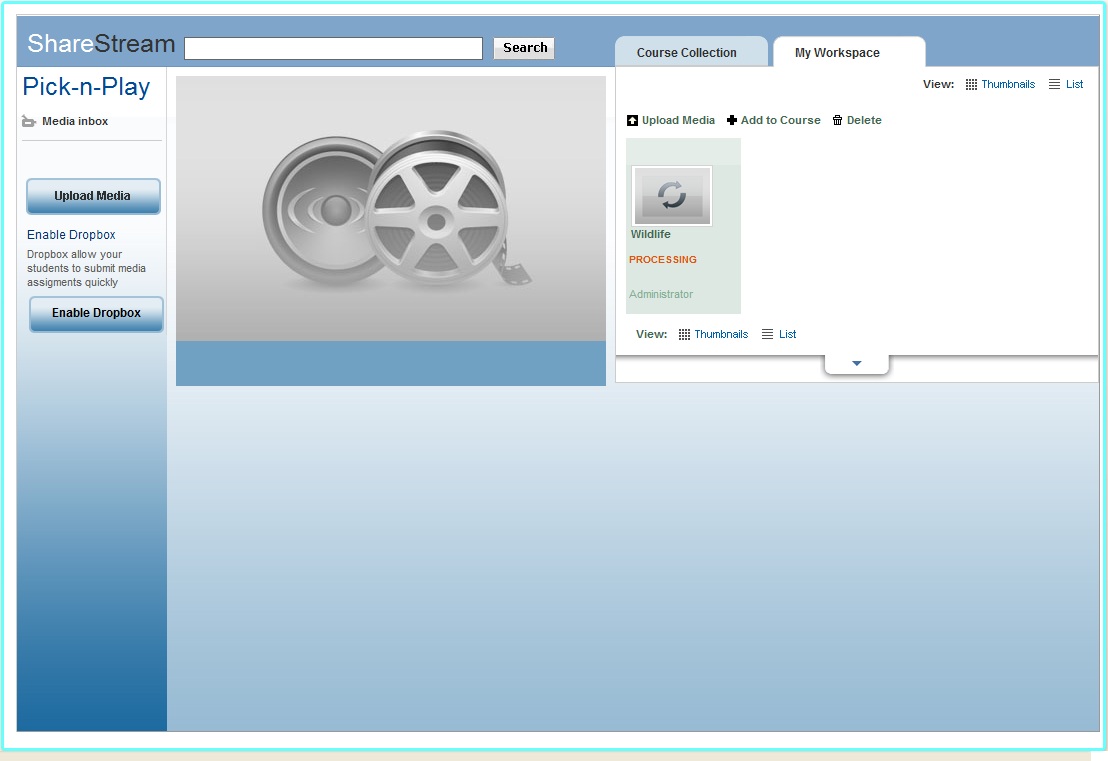
The ShareStream Pick-n-Play window should appear. Click on the tab "My Workspace" (1). Then click on the option "Upload Media" (2).
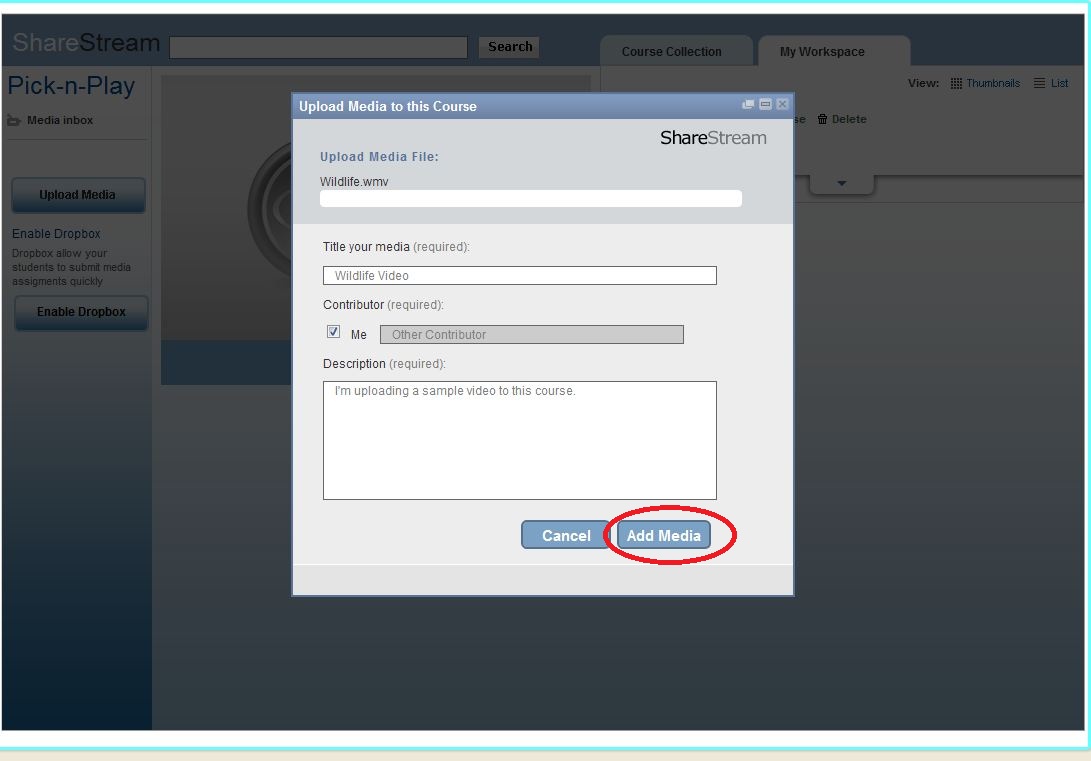
An upload window will appear. Click in the green area to select a video from your file system. Give the video a descriptive title, check "Me" for the contributor, and enter a short description. When you've filled in all the fields, click "Add Media".
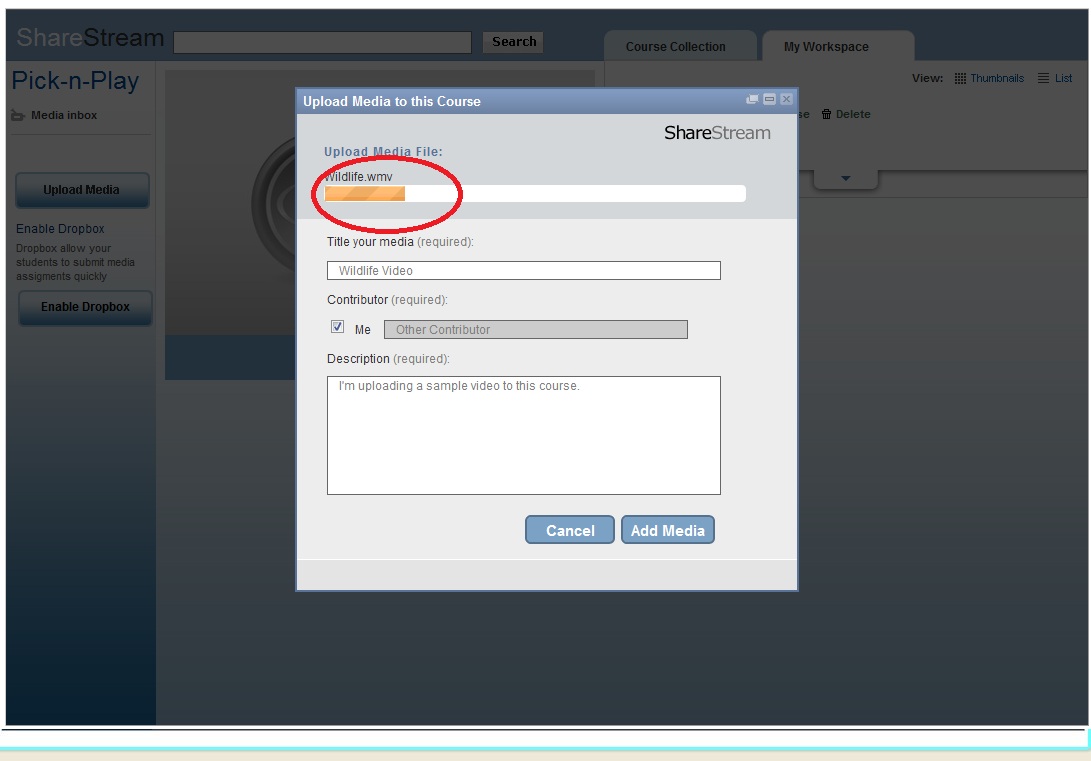
Now wait! You should see a progress bar indicating that the file is being uploaded. Get up and take a break for a while. Patience is key here: don't close the window or the upload will be cancelled, forcing you to begin again.
At the end of the process, you'll see a message indicating that the upload is complete. If asked whether you want to upload another video, select "No." You'll see on your screen an icon representing the video you uploaded, which is now being "processed", i.e. converted into a format that the ShareStream service can use. Wait until the processing is done -- this may take a while (up to an hour).
When the video is finished transcoding, a thumbnail will appear. You can also preview the video. However, the video has not yet been added to your course, only to your "Workspace" -- a holding pen associated with your username. To add the video to your course, check the checkbox in the upper right hand corner of the video thumbnail (1), and then click "+Add to Course" (2).
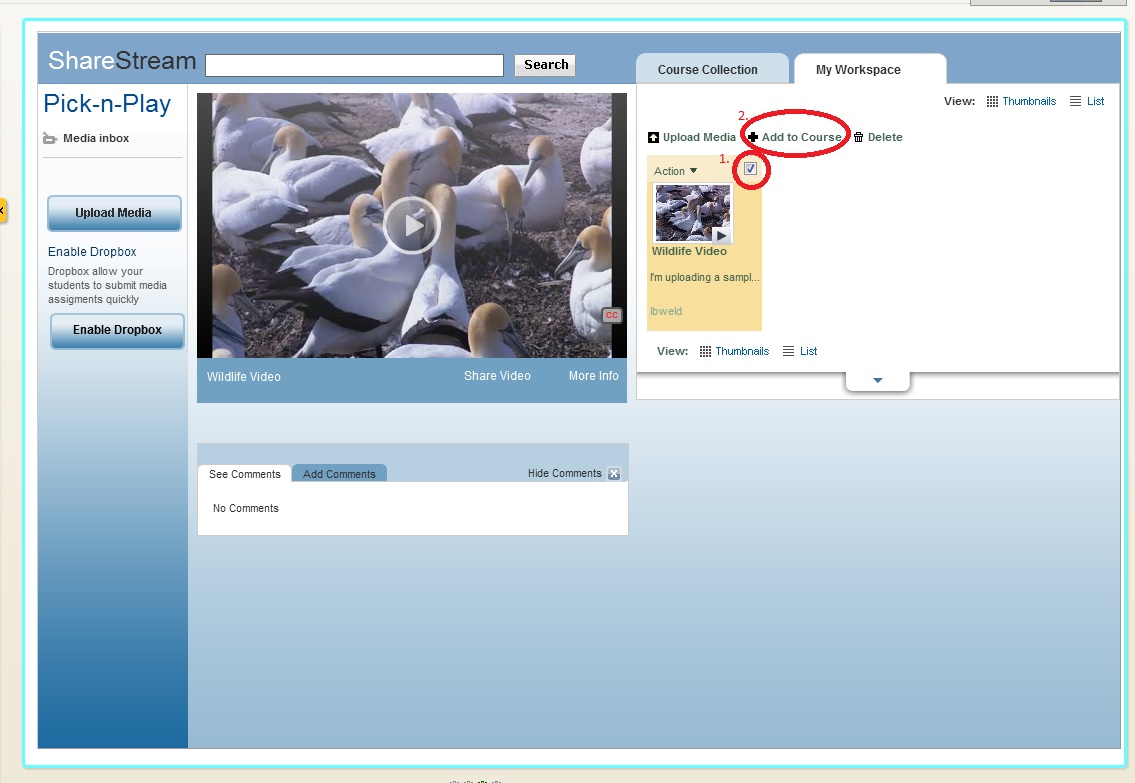
ShareStream will ask what course you want to add the video to. You will probably see only one option -- the course you are currently in. Make sure that the course is selected, then click "Done".

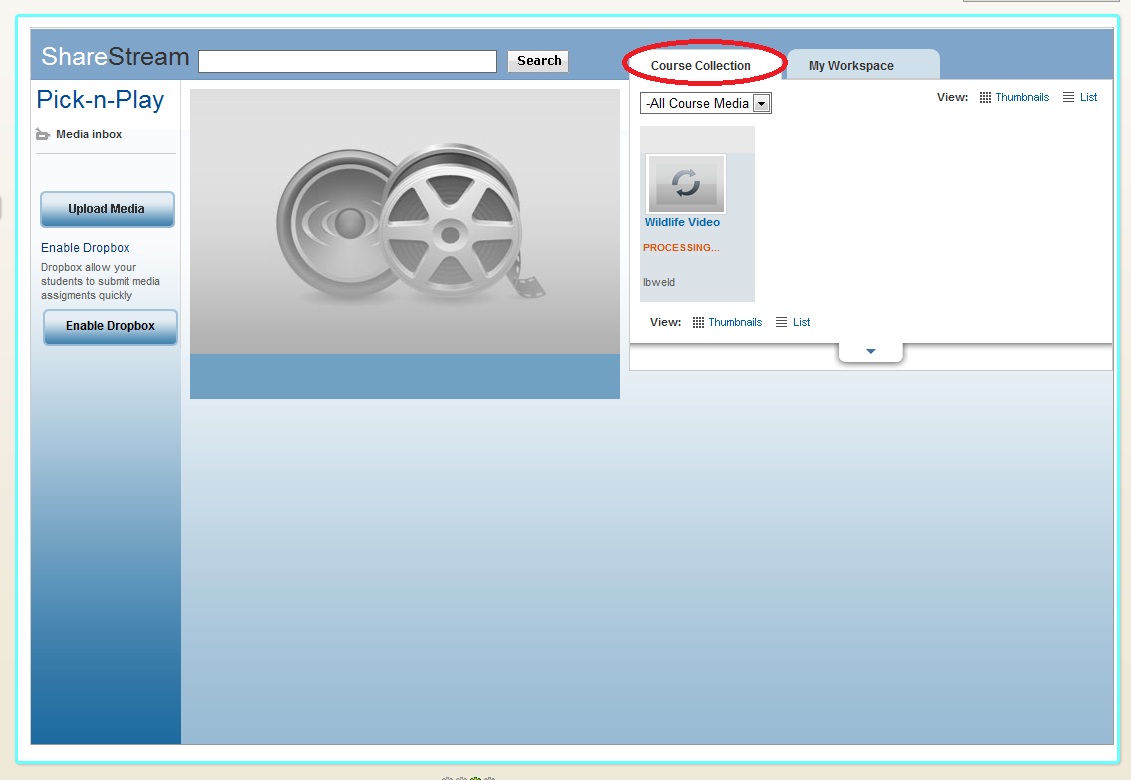
Click on the "Course Collection" tab. You should see a new icon for your video -- with "Processing" under it as before. (ShareStream needs to do further processing on your video, apparently, before it can be used in your course.) The second processing period may last a while -- longer than the first. Please be patient.
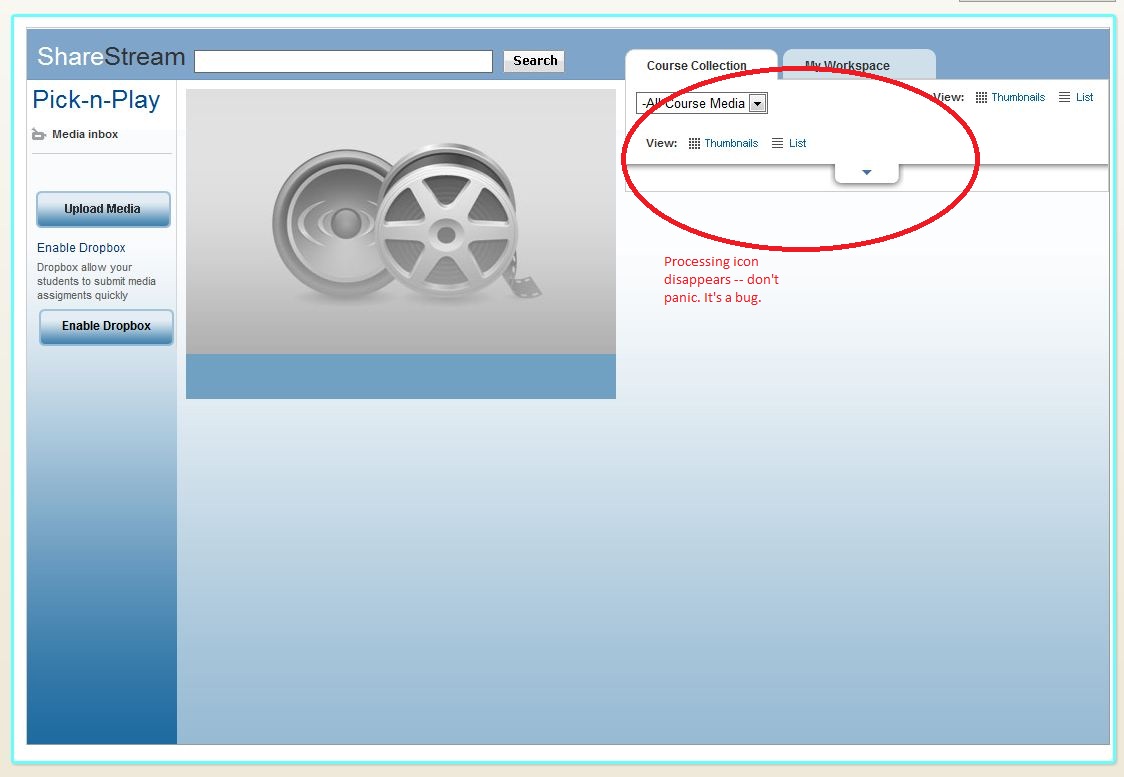
The "Processing" icon may disappear after a while (it may be a bug). In any case, continue to wait. When your video is ready, it will show up in your Course Collection. (A "Course Collection" appears to be a collection of videos for a specific Blackboard shell.) In contrast to the original file upload, you don't have to leave your browser open for the "processing" periods -- you can close the browser window or even shut your computer off while you're waiting for the second round of processing to finish.
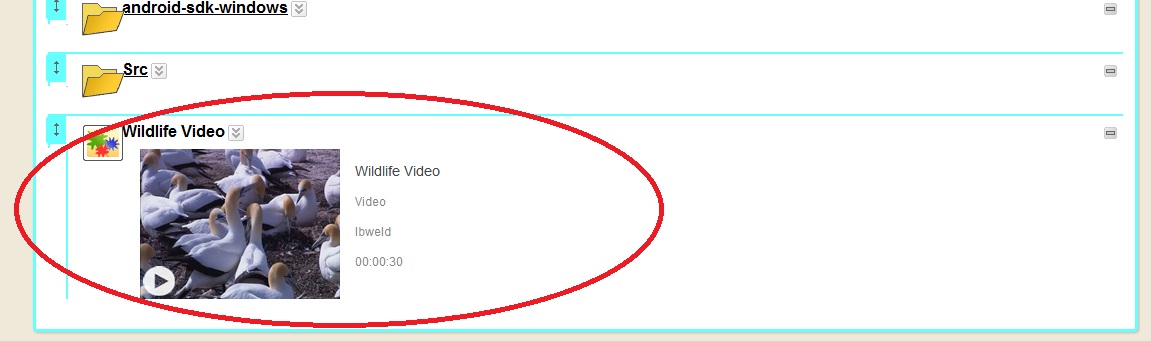
After what seems like a long interval, your course video will finally appear. Now you are ready to play back the video in the course. If you toggle between "Course Collection" and "My Workspace", you can see that the video is available in both areas. I assume this is because you may wish to make the video available in a second course/section in which you are listed as instructor.
Instruct your students to view the video by going to "Tools" > "ShareStream Pick-n-Play". Also, as described below, you can link to the video from an arbitrary location in your course.
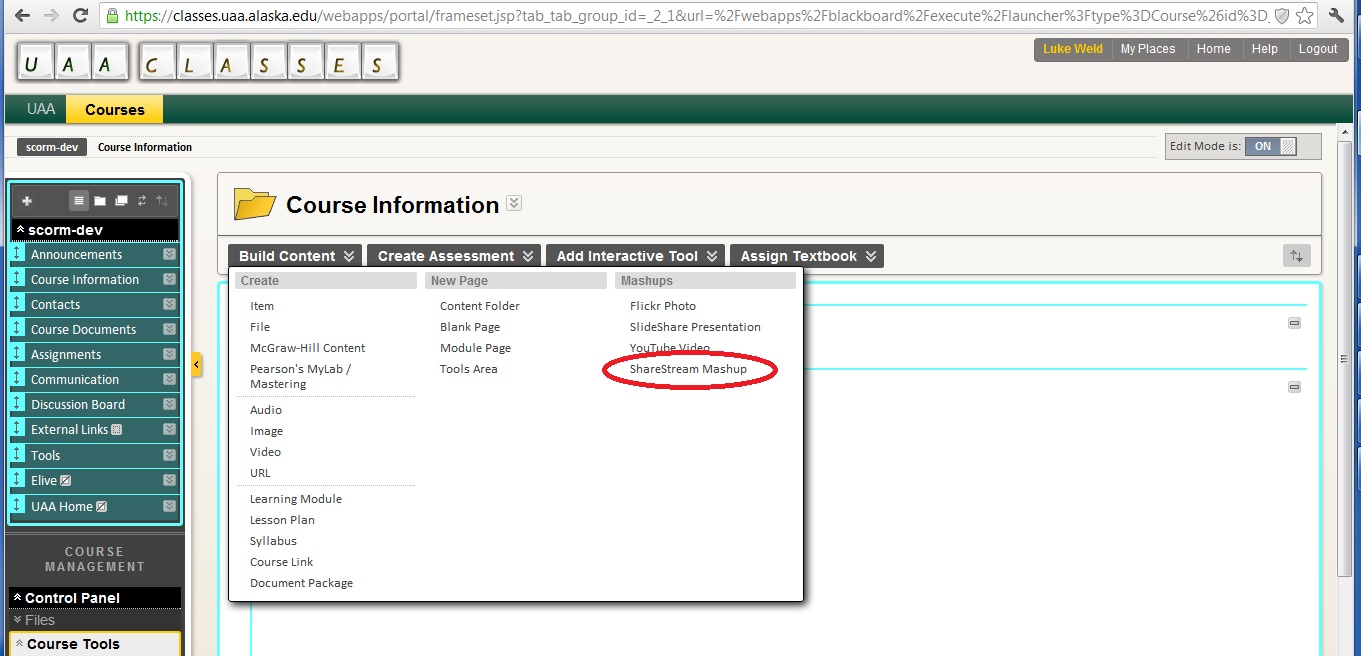
Link to a ShareStream video from somewhere in a course
You can link to videos once they've been added to your Course Collection (see above). To get started, go to a course area with Edit Mode turned on and click "ShareStream Mashup".
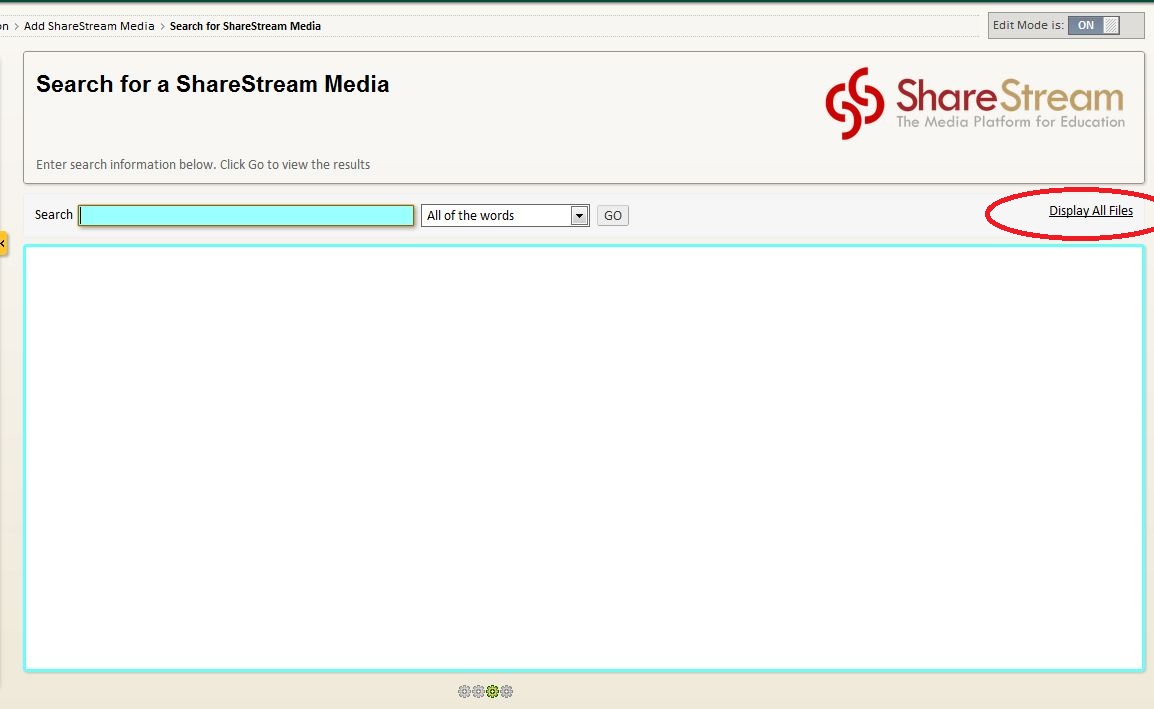
If you know the title of your video, enter it in the search box. If you don't remember the title, just click "Display All Files."
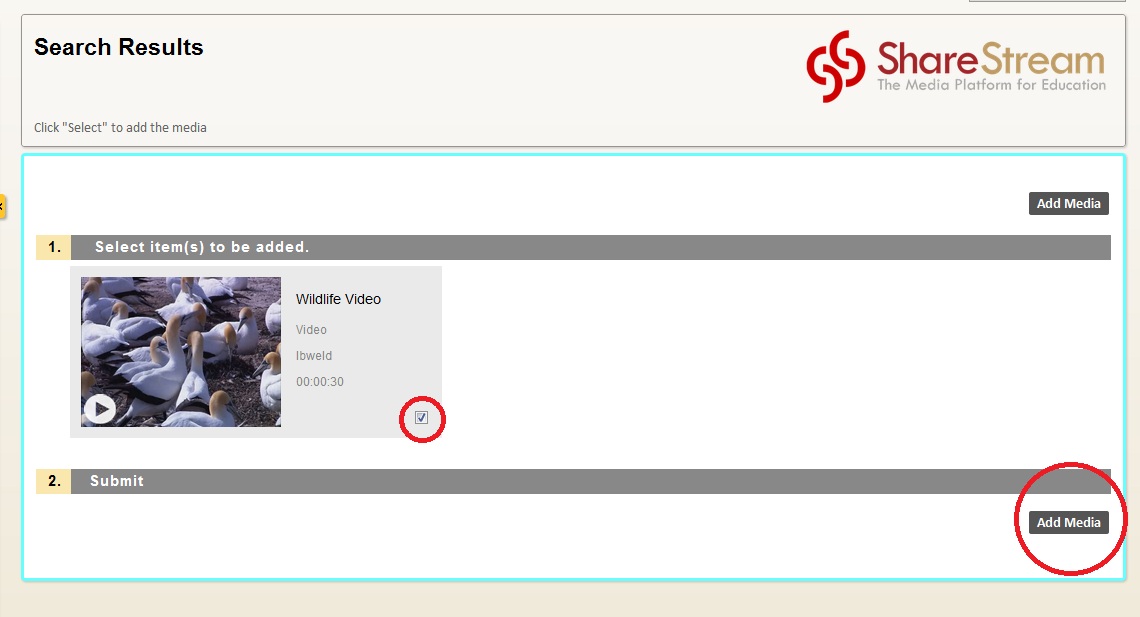
Mark the video you wish to add with the checkbox and click "Add Media."
The video will appear in your course for students to view. Note that if you try to view the video when Blackboard's Edit Mode is set to "ON", the video may not play -- you sometimes have to set Edit Mode to "OFF" in order to play the video.
Use the ShareStream Dropbox
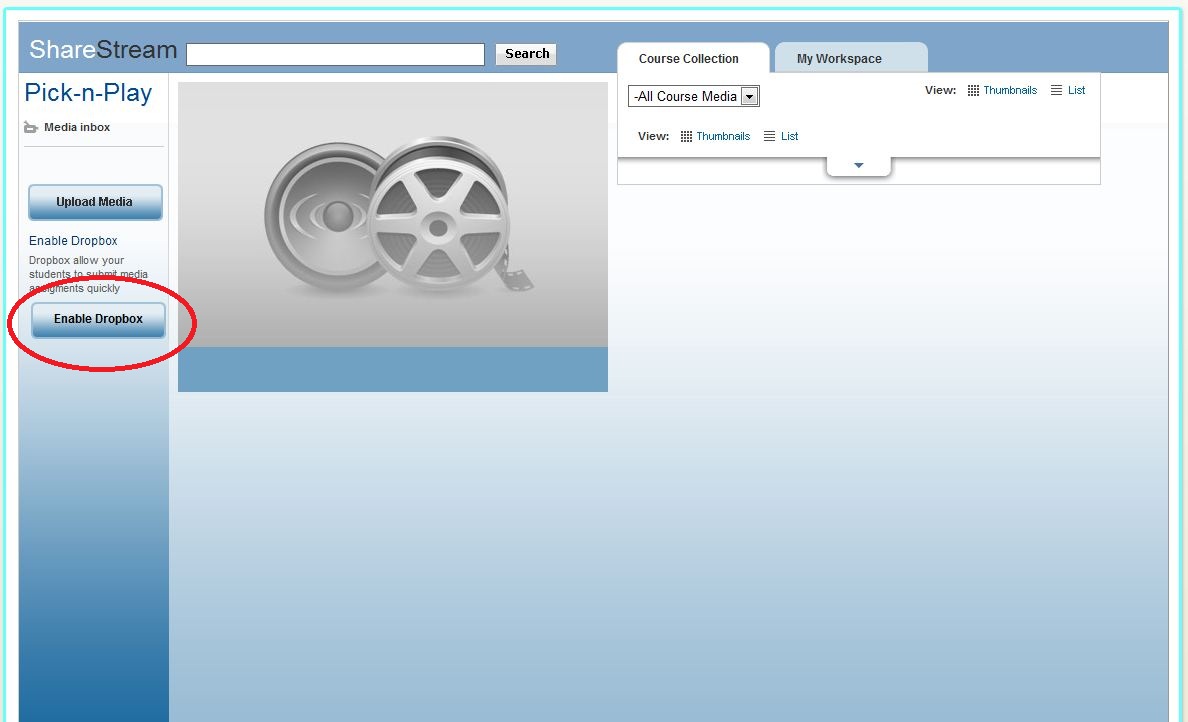
The ShareStream Dropbox allows students to upload videos to courses in which they are enrolled. The Dropbox is located in the ShareStream Pick-n-Play tool. In order for your students to use the Dropbox, the Dropbox must first be enabled. In the left-hand menu of your course, select "Tools". Then select "Pick-n-Play" to bring up the Pick-n-Play screen. In the Pick-n-Play screen, click "Enable Dropbox". (To Disable the Dropbox, click the "Disable Dropbox" link directly below the folder icon.)
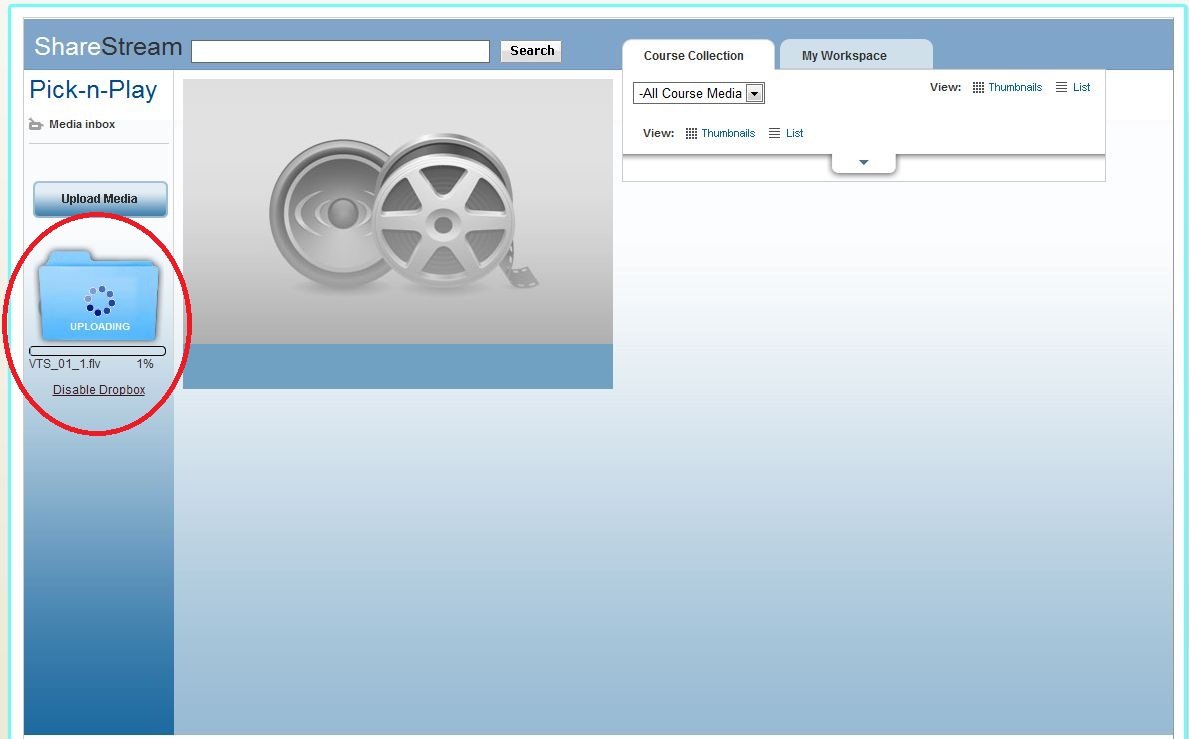
A folder icon will appear with the word "DROPBOX" printed on it. This icon will be visible to students when they go to Pick-n-Play. Try uploading a file to the dropbox. Click on the dropbox icon and select a video file. The file upload will begin. You should see below the Dropbox folder a progress bar throughout the upload process.
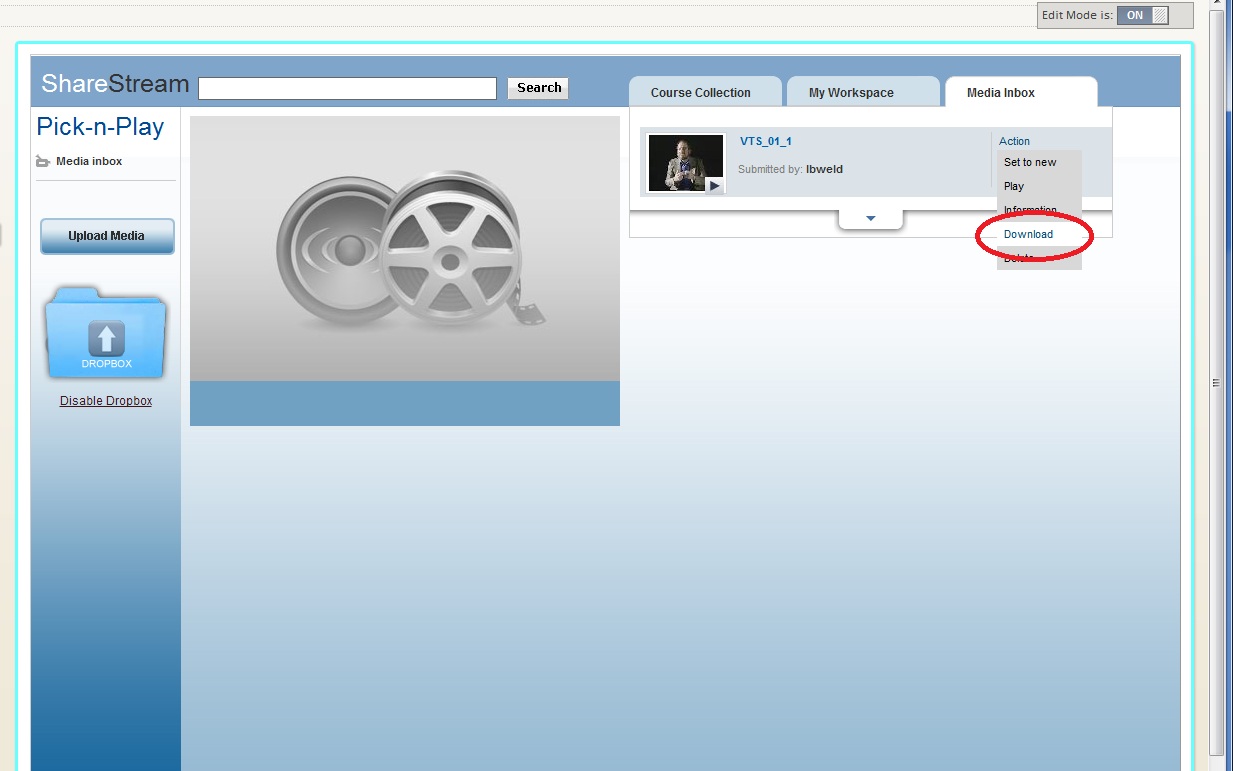
When the upload is finished, a brief processing interval will follow. Then the upload will appear (to you, the instructor) in the new Media Inbox tab. Click on the video thumbnail to review it in the video player. You can also mark the video as reviewed if you like. Note that "reviewing" the video does not appear to add it to your workspace or your course.
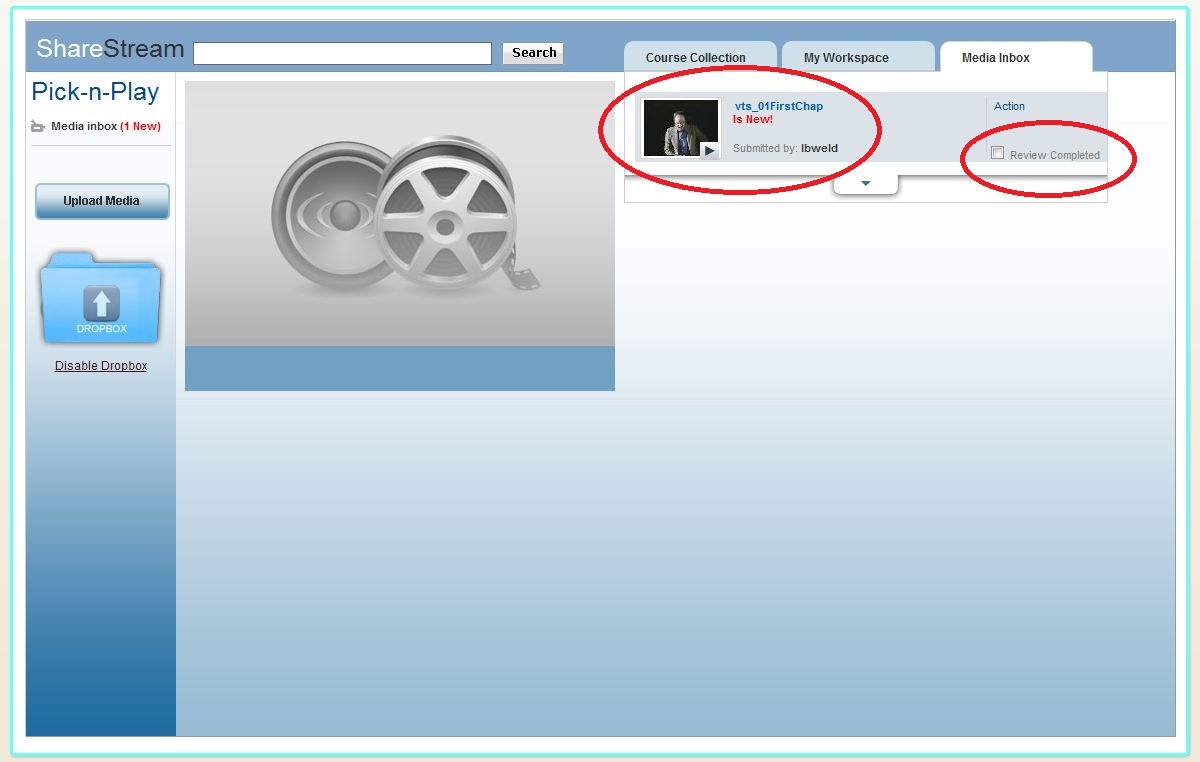
Click on "Action" to reveal a dropdown menu. From this menu you can play, download or delete the uploaded video. Note that there doesn't seem to be an option to migrate the video to your Workspace or Course Collection -- or to otherwise make the video available to the other students in the course. Unless I misunderstand (please correct me if you discover otherwise!), the only way to make the video available to students is to download it and then (re)upload it to your workspace as described here.